There are some reports of very old servers not being able to connect to WPCore.com because they are using an outdated version of curl. This causes a curl: (35) SSL connect error in the background. This is a Bug in Curl version 7.19. The best thing to do is make sure you are using an up to date version of curl.
In some cases our search returns other plugins in priority and not the one you are looking for. In this situation simply use the actual plugin slug from WordPress.org. This is the last part of the plugin page url. For example: http://wordpress.org/plugins/wpcore is our plugin page. "wpcore" is the plugin slug. Enter that into the box and just click add and it will add the correct plugin.
A custom plugin is a plugin that is not hosted within the WordPress.org repo. This may be a plugin you have developed privately that only you use or a premium plugin perhaps. You can add a custom plugin to any of your own private collections. You may also upload your own plugin files right on WPCore.com.
This happens in certain cases where your theme or another plugin is also using the TGM plugin activation class to suggest or require plugins for your site. For now please use the link in the admin menu on the left.
It is the equivalent of creating a brand new collection except you are starting with the plugins from an already existing collection. You can still add an edit the plugins of your new collection.
Look in the bottom right of your screen. There is an icon that looks like cogs. Click it.
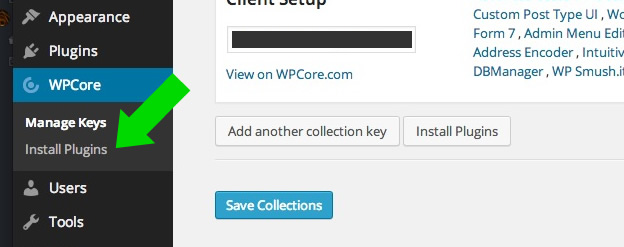
First you should download the WPCore plugin and install it in your WordPress site. Then simply visit the settings page of the plugin and add the key from the collection you want to add. Once you have added the key, WPCore will show you the plugins in a nice table and let you install them with the click of a button.
A basic account is free. You can use the service with a limited number of collections and features. More than enough to make the service extremely useful. But if you find you need more you can upgrade to pro in the My Account menu.
Yup. The plugin works just fine on multi site installs. You can either network activate it or activate it on a per blog basis. Each blog will have access to their own group of collections.
No of course not. In fact WPCore.com has no access to your WordPress installation even when you install the WPCore WordPress plugin. If you delete the collection, it simply will no longer be available from your WordPress site.
You can! If you know the key to the collection then you can drop that into your WordPress site as well.
No problem. You can simply grab the plugin slug right from the WordPress plugin URL and enter that. For example for WordPress SEO the WordPress URL is http://wordpress.org/plugins/wordpress-seo/. Th slug is the last part of that url or "wordpress-seo". Just type that in and click add.
By setting your collection to private, you remove it from the public directory of collections. However if it was every previously public, or for whatever reason somebody knows the collection key, they will have access to see what plugins are in it. This includes custom plugin source URLs added with custom plugins.
The number represents the total number of people that have favourited that collection.
Please log in to your WPCore account to submit a support request.
You can also Send us an email directly.
WPCore plugin installation
Option 1: Search for it
- Go to the Plugins screen in the WordPress admin panel.
- Click the Add New button
- Search for wpcore in the search box
- Click Install Now to install it
- Click Activate Plugin to activate it
Option 2: Download and install
- Download the WPCore plugin to your desktop.
- Click the Add New button
- Click the Upload tab
- Click Activate Plugin to activate it
Option 3: Manual FTP Upload
- Download the WPCore plugin to your desktop.
- Extract the Plugin folder to your desktop.
- With your FTP program, upload the Plugin folder to the wp-content/plugins folder in your WordPress directory online.
- Go to the Plugins screen in the WordPress admin panel and find the newly uploaded Plugin in the list.
- Click Activate Plugin to activate it.